If you’re using Docker compose for local development but have been interested in running your application on Kubernetes or creating ephemeral environments for your application, keep on reading, this post is for you!
At Release we know that Applications consist of more than just your repository and code. There are other services that are required, such as databases or key value stores. An application usually cannot run without environment variables, backing data, infrastructure, or storage component(s). That’s why we think that a Docker compose file is one of the best ways to describe your application for local development. It is also a perfect way to get started on Release and get your near-production environments spun up with each pull request. In this blog, we will walk through the steps to create an Application, highlight how Release helps transform your compose file into an Application Template and ultimately deploy it on Kubernetes (which we will cover in part two of this series).
We’ll be using https://github.com/awesome-release/rails_postgres_redis as the example in this post. It is a small application that runs a Ruby on Rails server, has requirements of a Postgresql database and a Redis server, as well as runs Sidekiq, which is a background job processor.
Let’s take a look at the compose file and then jump into creating our Application.
We won’t go through everything line by line but we wanted to make sure to note that in this compose file certain ports are exposed, as well as volumes are being defined to retain data between restarts. We also see that the containers have their <code inline>depends_on</code> defined to tell us in which order the containers should be started in. We encourage you to take a look at our Docker Compose conversion support documentation to see the full list of supported attributes.
Translating a Compose file into an Application
Now that we have a Docker Compose file ready, let’s see how to translate it into an Application in Release.
Step 1: Create your application
The first step in creating your Application is to give it a name and select which repository we’ll be using. I’ve named mine “release-docker-compose-demo” and selected the awesome-release/rails_postgres_redis repository (linked above).
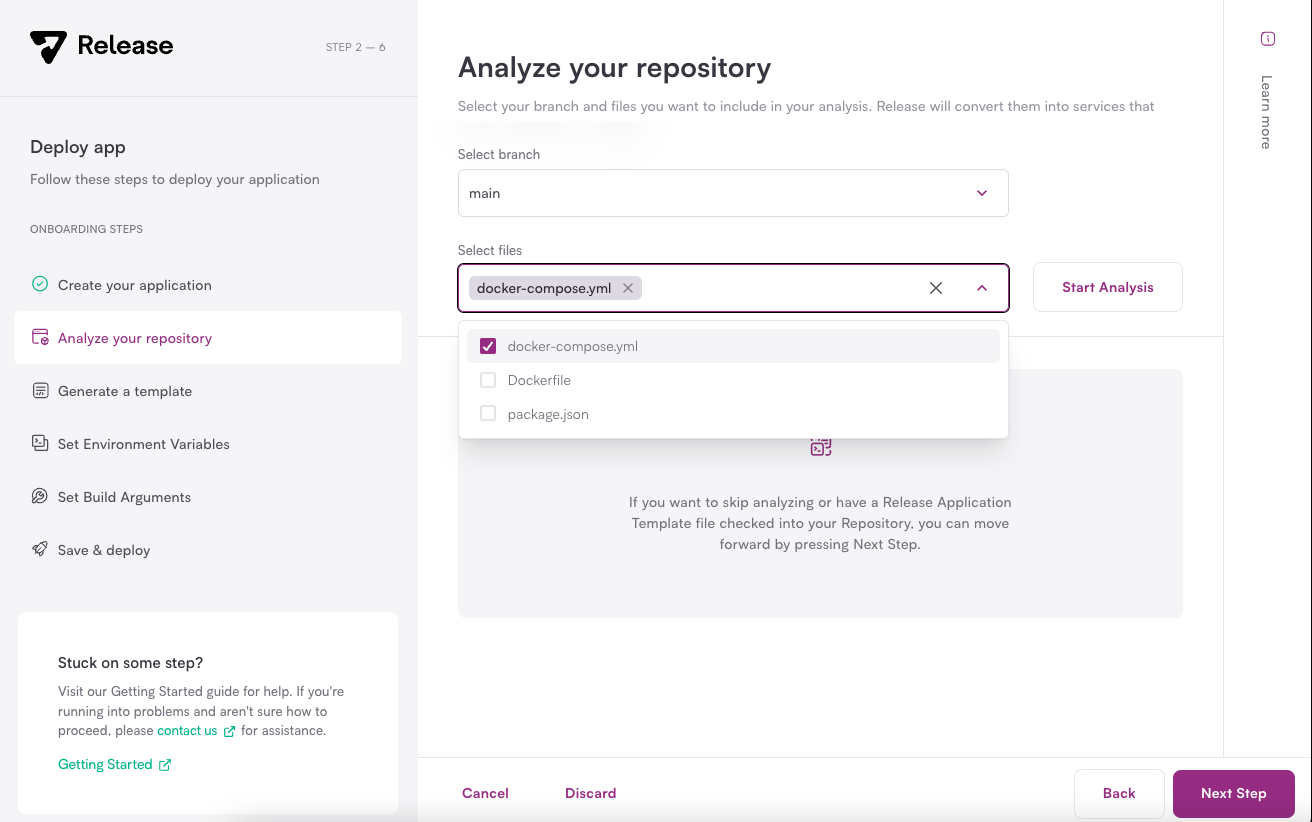
Step 2: Analyze your repository
The next step is to analyze the repository. We’ve selected the main branch and are shown some options of files we can select in a dropdown. The files we select will be analyzed and converted into what Release calls Services. These Services can have many types, such as Containers, Static Javascript Builds, Helm, and Terraform; we’ll primarily focus on Containers in this post but look for future posts where we’ll cover the other options.
We’ve selected our docker-compose.yml file and we will click the Start Analysis button.
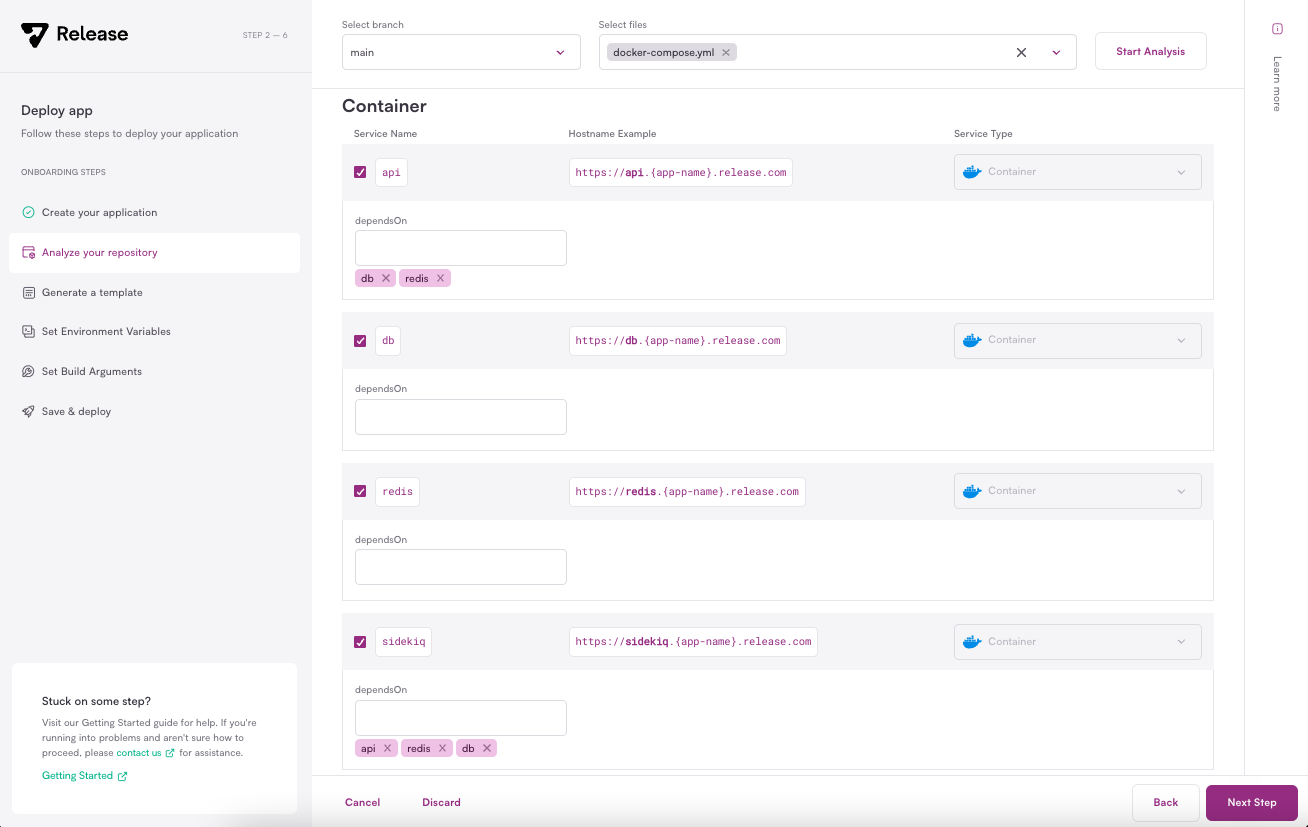
We see that Release created four Services for us with the same names as what is in the compose file. The dependencies are also listed. In this case we know that we want all these Services, but if something had been displayed that we didn’t want to deploy on Release, we could uncheck the Service to remove it. Now we’ll click Next Step to move on.
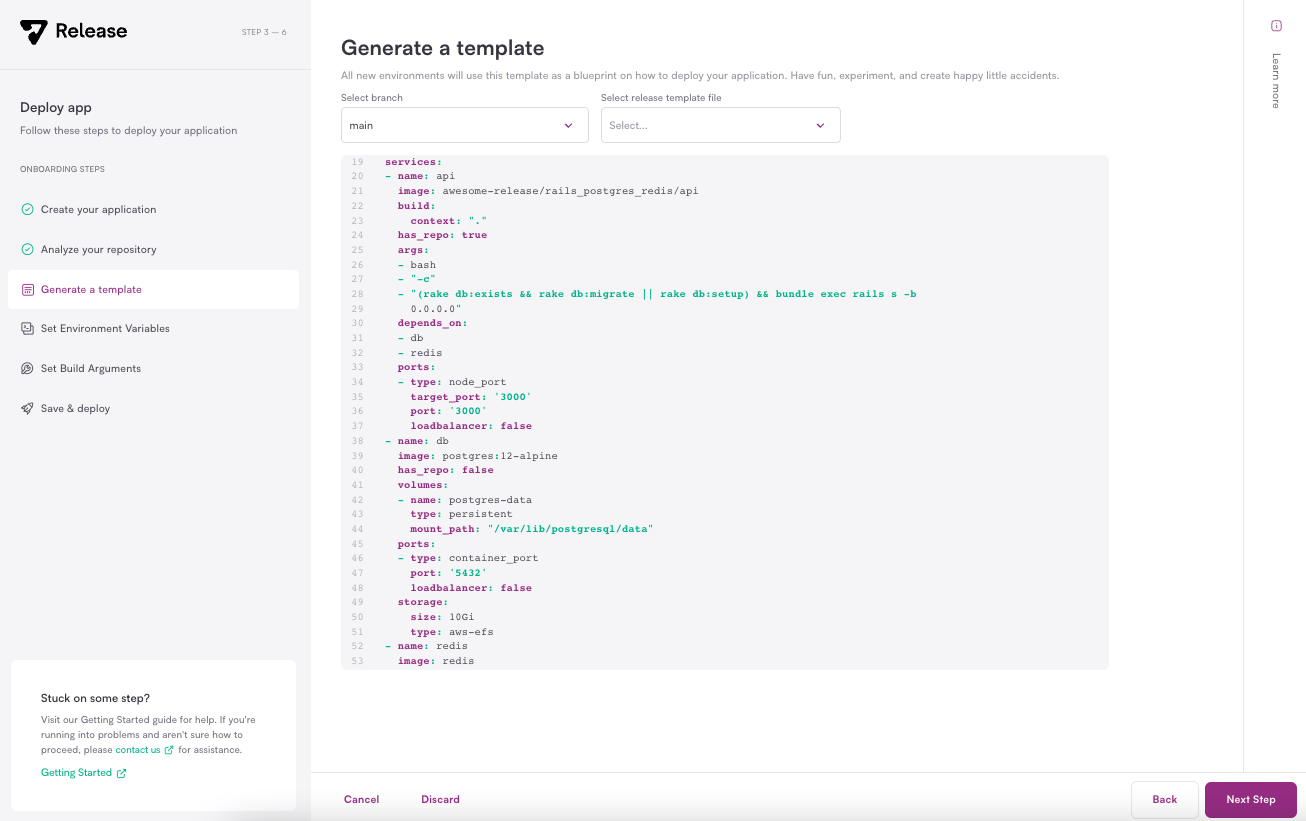
Step 3: Generate a template
In this stage we get our first view of an Application Template. We won’t go through everything in the template here, however we encourage you to read through the documentation on Application Templates to understand all the possibilities. Instead we’ll highlight how Release has translated the Services from the last page into this yaml format. We see the familiar names of <code inline>api</code>, <code inline>db</code>, and <code inline>redis</code> as well as the ports and volumes that were defined in the compose file.

The definitions of Services help to describe what Release will deploy, but we also want to know how Release will deploy these Services. That information is contained in the workflows stanza. There are three types of workflows defined: setup, patch, and teardown.
A setup workflow defines a deployment where infrastructure can be deployed for the first time or if there are subsequent changes to the infrastructure; think, changing your Postgresql version, the number of replicas of the <code inline>api</code> Service, or changing environment variables for your Application. We can also see that the order of the Services from the compose file <code inline>depends_on</code> is translated into the setup workflow. <code inline>db</code> and <code inline>redis</code> will be deployed in parallel first. Once both of those Services are up and running, Release will move to the next step and deploy <code inline>api</code>. Finally <code inline>sidekiq</code> will be deployed.
The patch workflow is used when only code changes need to be deployed. In our case, both the <code inline>api</code> and <code inline>sidekiq</code> Services contain the code from the repository and would need to be deployed when we push new changes. The <code inline>db</code> and <code inline>redis</code> Services don’t require any changes so they don’t need to be referenced in a patch.
The final workflow is the teardown which uses a Release defined task called <code inline>remove_environment</code>. This task will tear down all the infrastructure in Kubernetes and free up the resources that were being used. Additional steps can be added to a teardown workflow but the <code inline>remove_environment</code> is a requirement.
Now that we’ve had a quick runthrough of parts of our Application Template, we’ll click Next Step to move on.

Step 4: Set Environment Variables
Here we are presented with the Environment Variables that Release was able to extract from the compose file. If we wanted to add additional variables here we could but for this Application we won’t need any more so we’ll click Next Step.
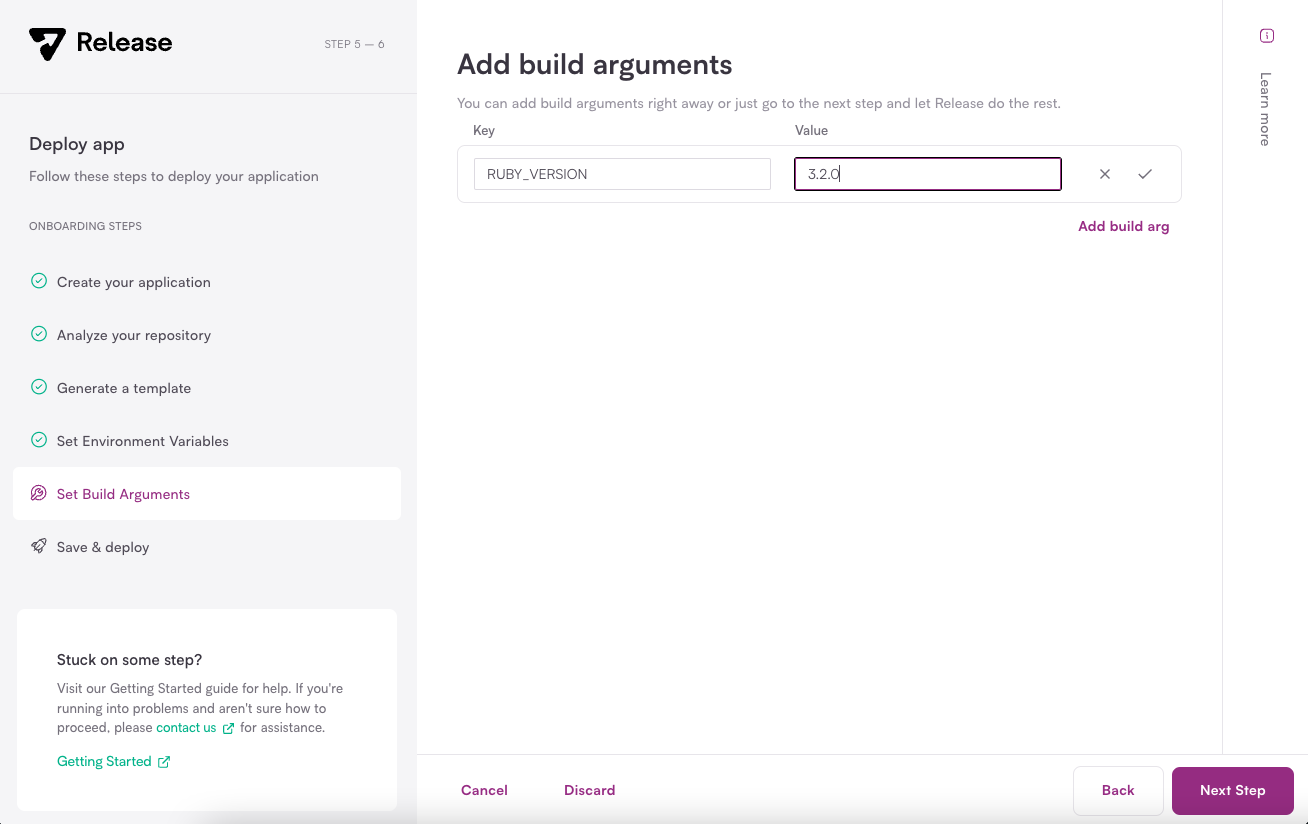
Step 5: Set Build Arguments
At this stage we are presented with the ability to add build arguments if we need to explicitly pass anything into our Docker build. For this Application, the Dockerfile accepts a build argument for <code inline>RUBY_VERSION</code> if we want to use a newer version than the <code inline>3.0.0</code> default. We’ll add an argument for the <code inline>3.2.0</code> version. We’ll be able to see this version used when we look at the build in part two of this series. After clicking the check mark to add our build argument, we’ll click Next Step to move on.
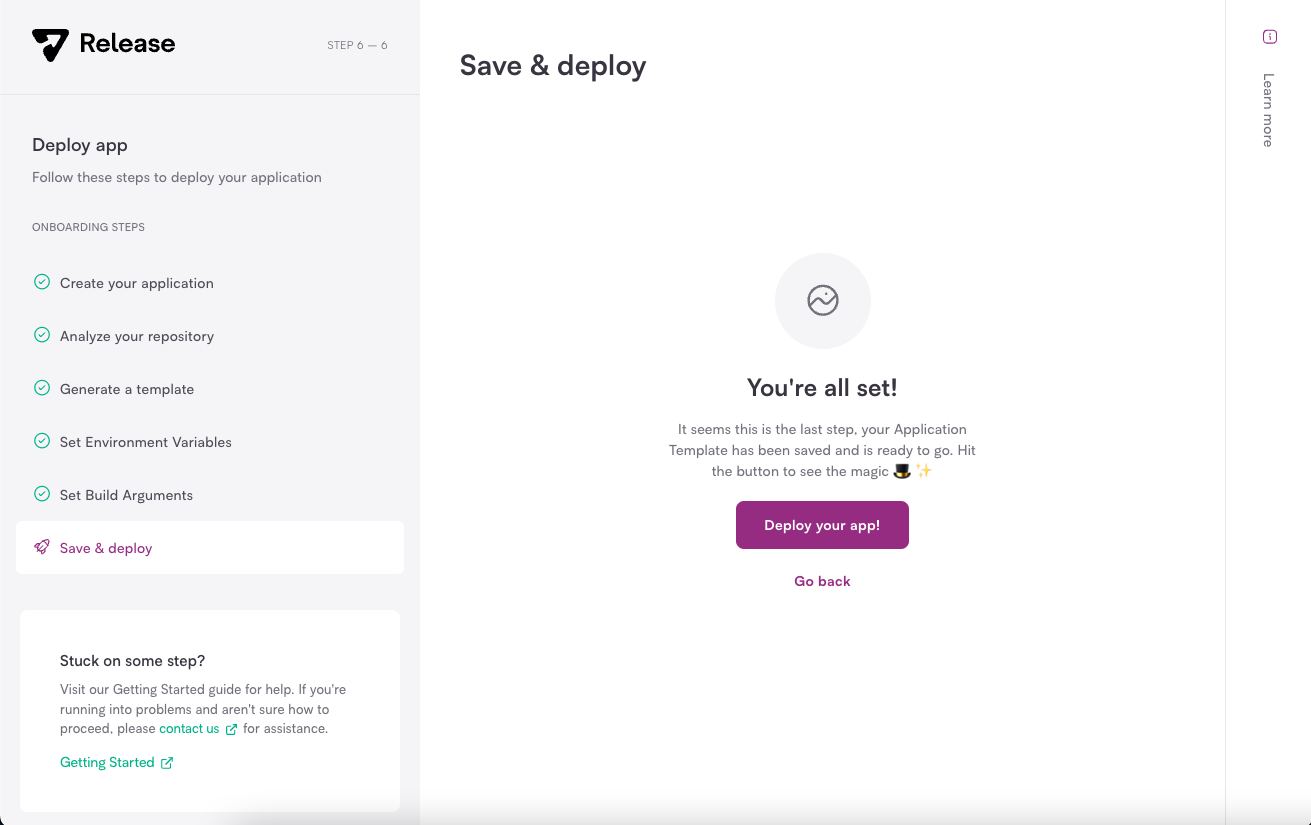
Step 6: save and deploy
The final step in creating our Application is to create a deployment. By clicking the “Deploy your app!” button, Release will create an ephemeral environment and start a setup workflow.
That’s it! 🎉 In short six steps we took our Docker Compose file and created an Application Template that we can now use to spin up ephemeral environments on demand.
In part two of this series, we’ll cover what happens during the deployment, as well as what Kubernetes objects were created. We will also use the ephemeral environment that was created to ensure that all of our Services are up and running. Stay tuned for part two and in the meantime take Release for a spin and let us know if you have any questions.

About Release
Release is the simplest way to spin up even the most complicated environments. We specialize in taking your complicated application and data and making reproducible environments on-demand.
Speed up time to production with Release
Get isolated, full-stack environments to test, stage, debug, and experiment with their code freely.